Did you know that you can create your own desktop background? And that it is really easy? Up until now, I’ve only been doing this for my own computer, but now that my kids are going to be home doing online learning, I decided to create a desktop background to facilitate their computer usage.
My kids are young enough that I don’t want them randomly searching the internet, but I want to give them plenty of options to watch, read, and learn. By organizing their laptop screen this way, my kids can navigate to specific websites, folders, and software on their own.
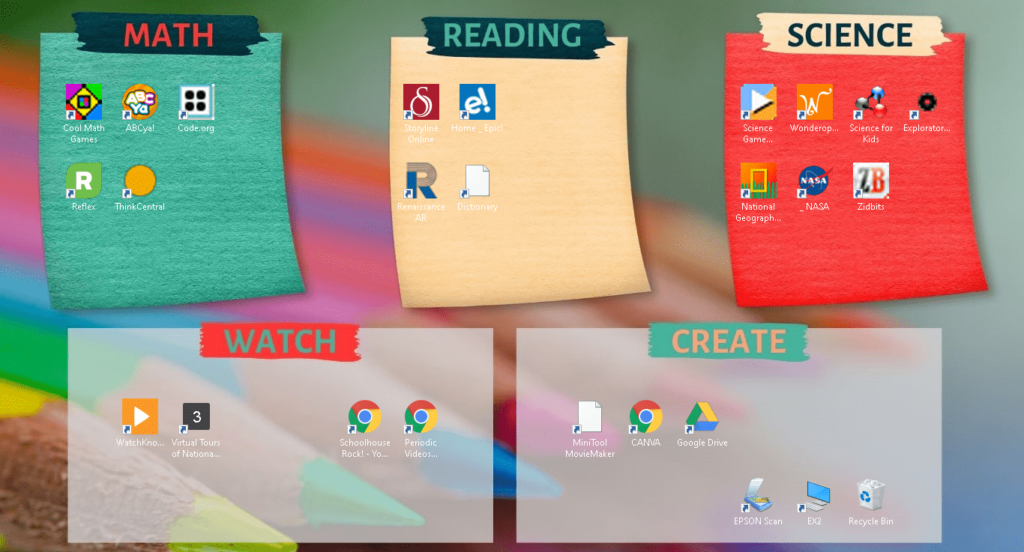
Here is the desktop background I’m going to demonstrate today. (By the way, I’m applying the commonly used phrase desktop background, but this is equally applicable to a laptop, and is also known as desktop wallpaper.)

This project is perfect for me since I love: 1) organizing, and 2) making pretty things! I’m going to go through step-by-step for those who like written instructions (hand raised over here). I also made a video demonstrating the process for those visual learners out there.
Create a desktop background in Canva
We are going to create our desktop background using Canva. If you are unfamiliar with Canva, it is a supremely user-friendly graphic design platform. It is free to use, although they offer a “Pro” upgrade with additional features.
1.You will need to create a free account at www.canva.com.
2. Click on the button to “Create a Design”. From the dropdown menu, select Desktop Wallpaper.

You will see a screen that has images of templates on the left, and on the right is the blank area that you will use to create your background. There are dozens of really amazing free templates, so feel free to play around in here! I am going to show you how to create the one that I made using a photo uploaded to Canva.

Upload an Image
I wanted to use a specific image of post-it notes for my background. The photo is from www.pixabay.com. You can find hundred of free images here. The one I used is THIS ONE (Image by Annalise Batista from Pixabay). If you choose to use this image, download it and save it on your computer before going any further.
3. Click on the Uploads icon in the left-side menu, and then the “Upload Pictures or Video” button. Navigate to your stored photo and select it for upload. We will come back to that photo later.

Add a Background Image
4. In the left-side menu, click Photos, then enter colored pencils in the search box. Scroll until you find this picture and click on it. It will appear in your blank design area on the right.

5. Click on the round corner in the lower left and drag it down to expand the image. You are able to click on any of the corners or sides and drag to increase the image size. I chose to position my image with the yellow pencil tip just inside the lower left corner of the template as shown below. This image will serve as your background of the wallpaper.

6. In the left-side menu, click on Elements. Scroll down to Grids, and click on See all.

Add a Grid for Photo Images
7. Choose the grid image with three columns and click on it. It will appear on top of the colored pencil image. Click on the small white bar at the bottom of the grid and drag it up so that the grid covers around half of the pencil image.

8. In the left-side menu, click on Uploads. Find the image you uploaded earlier, and click on it. It will appear on your image design.

9. Click on the image and drag it onto one of the grids. You will see the post-it image within the single grid. A menu will appear in the taskbar above when your image is selected. Click on Crop.

10. Drag the corner of the image to enlarge it until you have one post-it note appearing in the grid space on the far left. Then click Done.

11. Now you will repeat this process. Select the image from your Uploads folder. After it appears in your design, drag it to the middle grid. Click on Crop in the taskbar menu, drag the image corner to enlarge it until one post-it image is scaled to fit into the grid, and click Done. Do this one more time for the third grid. I chose to use three different colors of the post-its pictured in the photo. After you select Crop, you can drag the image around to position it any way you choose. Your will have something that looks like this:

Add Shapes
It’s starting to take shape, right!? Now we’re going to add a couple of additional boxes on the bottom half of the screen. You could add additional grids and more post-it photos, but I wanted something a little visually different. We are going to add two boxes, layer on a couple of lines to mimic the tape in the post-it images, add some text, and we’re done.
12. In the left-side menu, click on Elements. Scroll to Shapes. Select the square.

13. Drag the square into position, and size it into a rectangle.
14. The default color of shapes is gray. You can choose a different color by clicking the small square in the upper left of the taskbar. A menu of colors appears on the left. I chose to make my rectangle light gray, but feel free to get creative! Next, I wanted to increase the transparency of my rectangle so that some of the colored pencil image is visible behind it. The checkerboard looking icon in the taskbar controls the transparency. Mine is set at 75.

15. With the rectangle selected, click Duplicate in the taskbar. Another rectangle will appear on top of the first. Drag the second rectangle into position. You will see dashed lines to help you align the two.

16. Click on Elements in the left-side menu. Scroll to Lines, and click See all.
17. Scroll down until you find the image that looks like the one pictured below (similar to the tape in the post-it image) and click on it.

18. Use the corners to resize to a smaller size and drag into position on top of the rectangle. With the line selected, click Duplicate in the taskbar and drag the second line to the top of the second rectangle.

19. Click on one of the white lines to select it, then click on the color square in the task bar. I chose to make one line red and the other teal. You can type a color in the search bar and scroll through the many options, or use the new color square to make a custom color. I used #f85646 for my red line, and #48b39c for my teal line. You can type these in the search bar if you want to use those exact colors.

Add Text
20. In the left-side menu, click on Text, then Add a little bit of body text.

21. Drag the text box up to the first post-it and position it on top of the “tape”. Type MATH into the text box. Click on the text color icon in the taskbar and choose a color for your text. I used a beige color #e3caab. Next, click on the drop-down font menu and select a font you like. I used Montserrat Classic. Now you can position your text box right where you want it. You may want to change the font size. You can drag the round dot in the corner of the text box to adjust the size up or down, or choose a size from the dropdown menu in the taskbar.

22. With your text box selected, click Duplicate on the taskbar. Drag your new text box into position on the next post-it image. Click in the text box and change the word to READING. You may want to change the color as well. Repeat this process for each word until you have all five: MATH, READING, SCIENCE, WATCH, CREATE. (Or pick your own :))
You did it! You’ve created the design for your wallpaper background.

Download Your Image
23. In the upper right corner, click on Download. Choose PNG or JPG and click the Download button.

24. Save the image on your computer.
Set the Image as Wallpaper Background
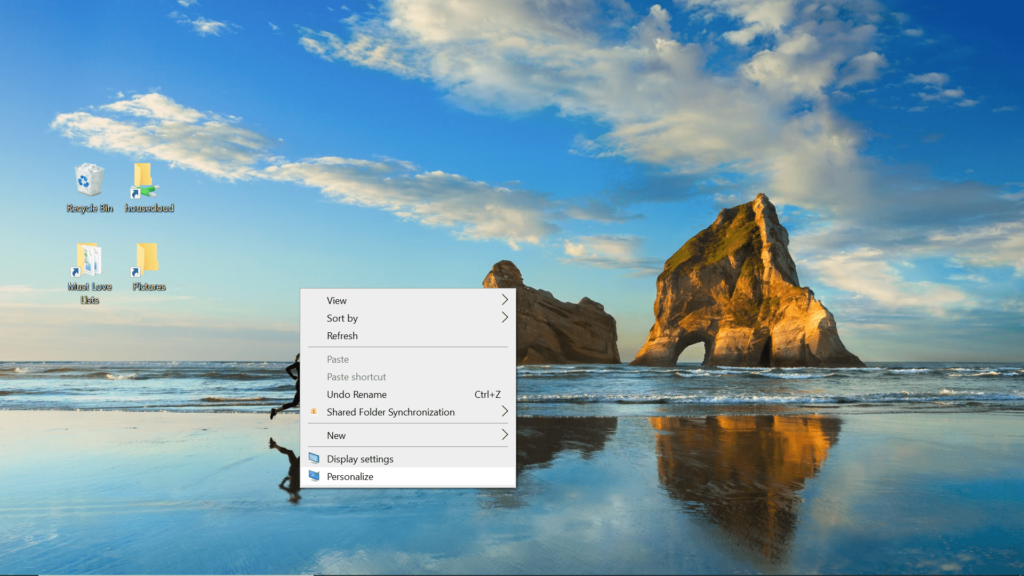
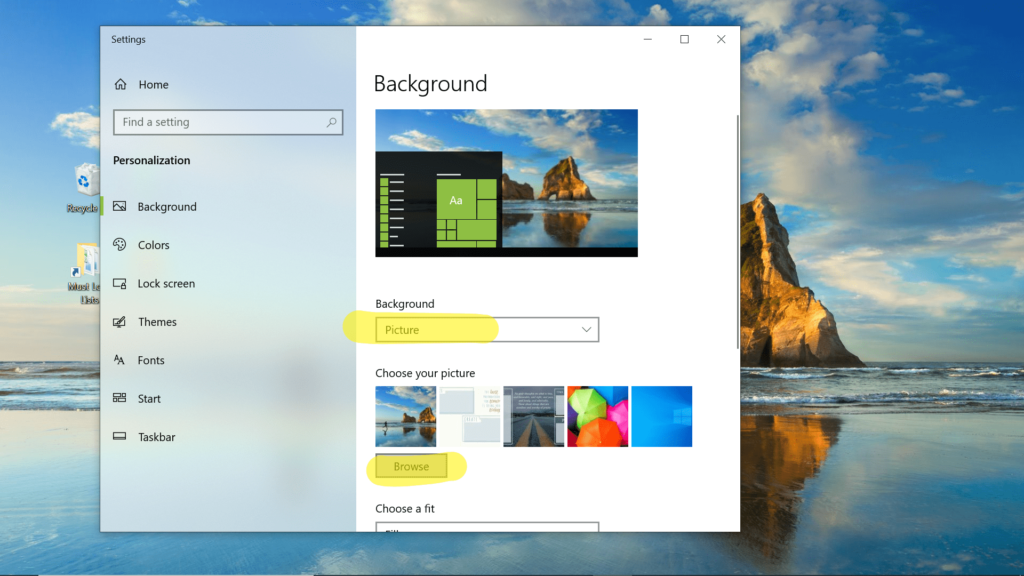
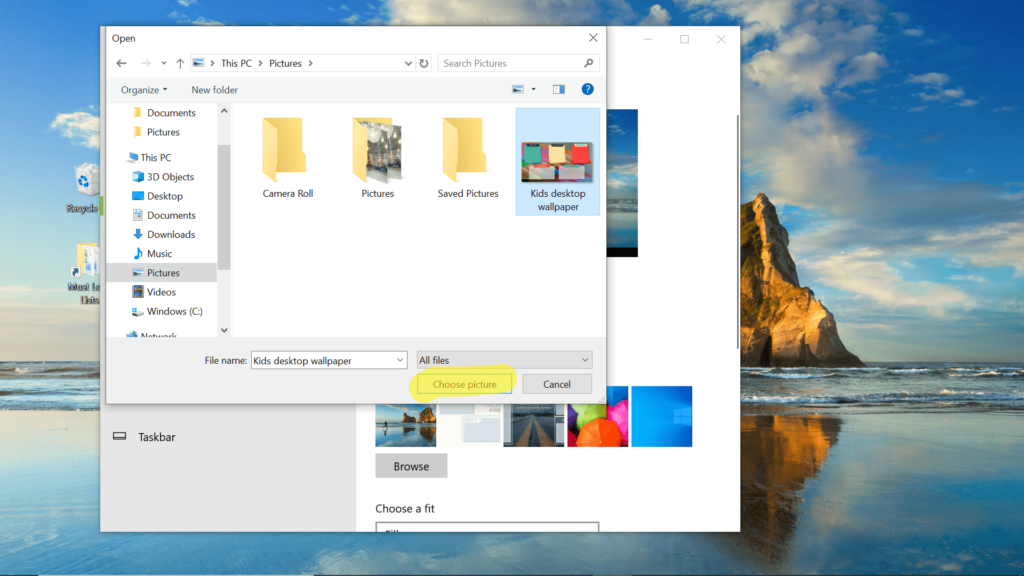
25. Close or minimize everything on your computer until you can see the current wallpaper background. Right-click, and a small menu will appear. Click on Personalize. Make sure your background option is set to Picture and then click the Browse button. Navigate to the image you saved from Canva, and select the image. Then click Choose picture.
Your image should immediately appear as your desktop background. That was the design portion.
Now we get to organize the desktop with files and links to make it super kid-friendly.
Add Shortcuts to the Desktop
There are so many websites with amazing material to engage kids in learning. If you need some ideas, check out this HUGE list of educational resources at Open Culture. If there are specific websites your child already likes, or is using at school, you can start with those.
Pick a website and navigate to where you want to have it open, like you would bookmark a page. There are two easy ways to send a shortcut to your desktop.
- Make sure that your browser window is sized down so that you are able to see a portion of the desktop behind the web browser. Click on the website URL and drag it over onto the desktop. It will automatically create a shortcut.
- Click on the three dots in the upper right corner. From the menu, choose More tools, then Create shortcut. A shortcut will appear on your desktop.


You can right-click on the shortcut and rename it to whatever makes sense to you. I usually shorten the names to tidy it up.
Drag the shortcut to whichever box you want it to appear in. In the case of this website, WatchKnow,Learn.org, they offer hundreds of educational videos on a variety of topics, so I put it in the WATCH box.
Add Shortcuts to Websites used at School
My kids use sites like Think Central, Reflex, Accelerated Reader, and Storyline Online at school, so I put these on the desktop for easy access. They are able to log in at home with their unique log-in and password information.
Add Other Shortcuts
I added a shortcut to Google Drive (now more than ever they will probably need to complete and share work online). A few other useful shortcuts are Dictionary.com, Khan Academy, Fact Monster, and Homework Spot.
That’s it! Your kids can experience fun, engaging, and educational places on the internet without having to navigate through bookmarks or searches (that might turn up things you don’t want them finding anyway). They click on the shortcut and go straight to the web address or folder you’ve set up for them.
Here’s an example of what my kids’ desktop background looks like at the moment. It’s easy to add or remove shortcuts and drag them around wherever you like on the desktop. Plus it looks extra fun with the amazing background you made in Canva!


If you need ideas for some learning or fun websites, read my List of Fun Educational Resources.
Tools to Help Your Kids Plan and Prioritize